
10 Easy Braided Hairstyles for Beginners
Are you looking to elevate your hairstyle game without spending hours in front of the mirror? Braids offer a versatile and stylish solution, perfect for everyday wear or special occasions. Whether you’re a complete beginner or just looking to expand your braiding repertoire, this comprehensive guide will teach you 10 easy braided hairstyles for beginners. For more hair care tips and inspiration, visit hairy.cartlab.web.id. We offer a wide range of resources to help you achieve your dream hair. Mastering these braids will not only save you time but also add a touch of elegance and sophistication to your look. From simple three-strand braids to more intricate styles, we’ll break down each step with clear instructions and helpful tips, ensuring you achieve beautiful results every time.
Braiding your hair can be a fun and rewarding experience. It’s a skill that improves with practice, allowing you to experiment with different techniques and create unique looks. This guide focuses on easy-to-learn braids that are perfect for beginners, providing a solid foundation for more advanced braiding techniques in the future. So grab your hairbrush, some elastics, and let’s get started!
1. The Classic Three-Strand Braid

The three-strand braid is the foundation of many more complex braided hairstyles. Mastering this basic technique will unlock a world of possibilities.
- Start with detangled hair: Begin by brushing your hair to remove any knots or tangles. This will make the braiding process much smoother.
- Divide your hair: Divide your hair into three equal sections.
- Cross the sections: Take the right section and cross it over the middle section. Then, take the left section and cross it over the new middle section.
- Repeat the process: Continue crossing the right and left sections over the middle section, alternating until you reach the end of your hair.
- Secure with an elastic: Secure the end of the braid with a hair tie.
This simple braid can be worn alone, incorporated into other styles, or used to create a stylish ponytail.
2. The Side Braid
A side braid is a simple yet elegant variation on the classic three-strand braid. Perfect for everyday wear or a more casual look.
- Part your hair: Part your hair to one side.
- Gather your hair: Gather all your hair to one side, at the point of your part.
- Begin braiding: Begin braiding as you would a classic three-strand braid.
- Secure the braid: Secure the end of the braid with a hair tie. You can leave it loose and slightly messy for a more relaxed look, or pull it tighter for a more polished appearance.
3. The Fishtail Braid
The fishtail braid looks intricate but is surprisingly easy to learn. This braid adds a touch of bohemian flair to any hairstyle.
- Divide your hair: Divide your hair into two equal sections.
- Take a small strand: Take a small strand of hair from the outer edge of the right section.
- Cross it over: Cross this small strand over to the left section.
- Repeat on the other side: Take a small strand from the outer edge of the left section and cross it over to the right section.
- Continue the process: Continue taking small strands from each side and crossing them over until you reach the end of your hair.
- Secure with an elastic: Secure the end of the braid with a hair tie.
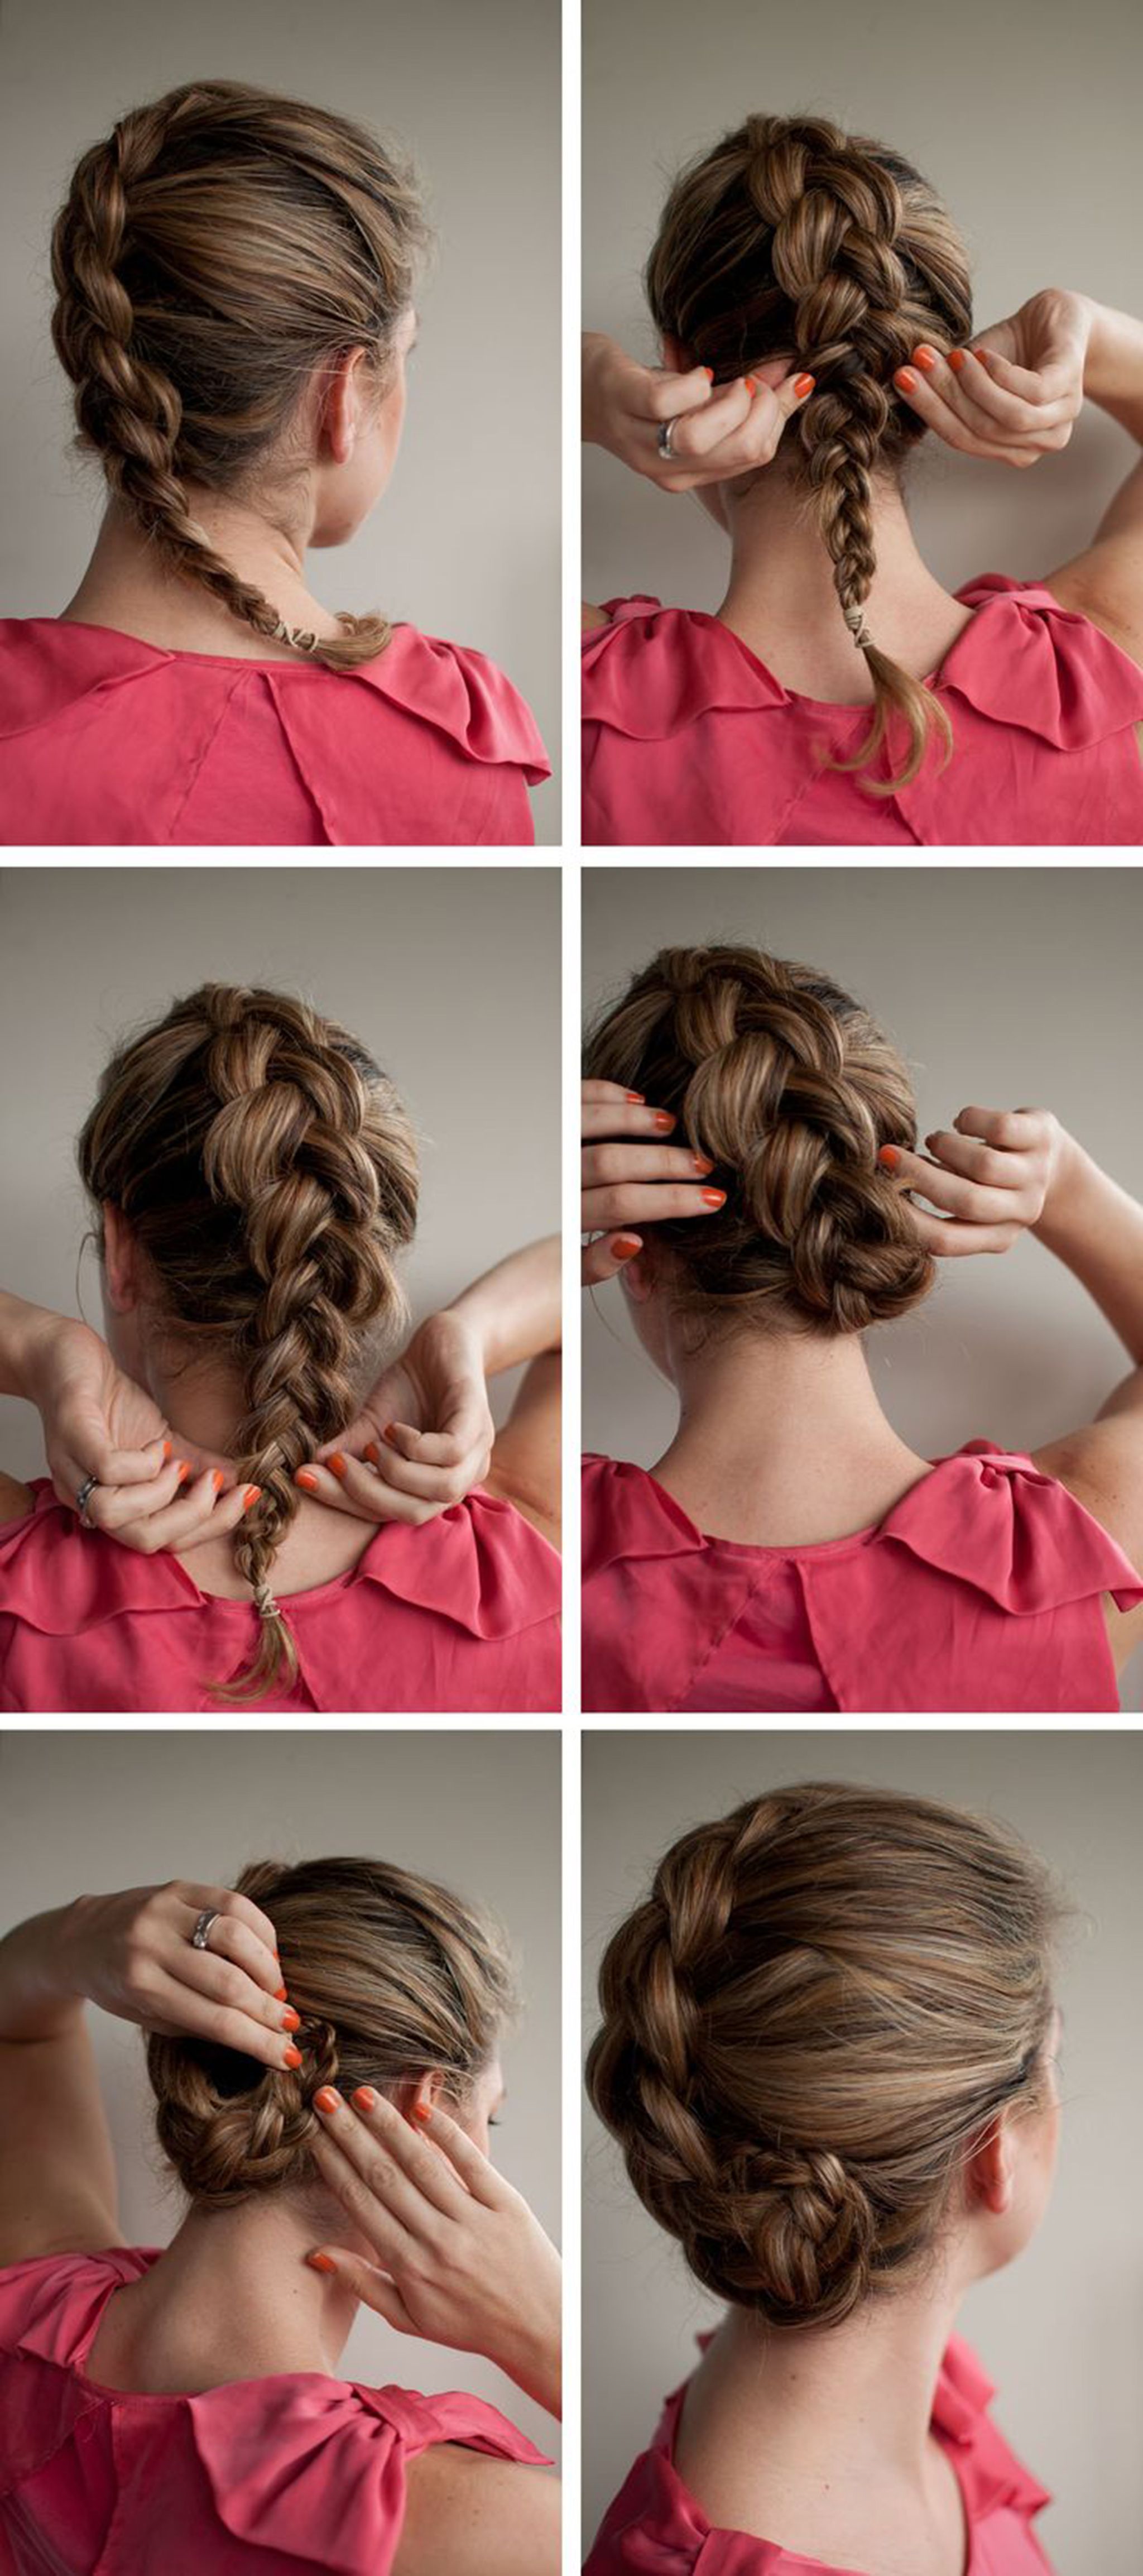
4. The Dutch Braid
The Dutch braid is an inverted French braid, creating a beautiful raised braid that adds volume and texture.
- Start at the crown: Begin braiding at the crown of your head.
- Divide your hair: Divide your hair into three sections.
- Cross under: Unlike a French braid, cross each section under the middle section instead of over.
- Add hair: As you braid, add small strands of hair from the sides, incorporating them into the braid.
- Continue braiding: Continue braiding until you reach the nape of your neck.
- Secure with an elastic: Secure the remaining hair with an elastic. You can leave the ends loose or continue braiding them into a regular three-strand braid. This style is particularly beautiful for those considering romantic braided wedding hair for their outdoor weddings, as described on our blog: Romantic Braided Wedding Hair for Outdoor Weddings.
5. The Pull-Through Braid
The pull-through braid is a quick and easy way to create a stylish and sophisticated look. It’s perfect for medium to long hair.
- Tie a high ponytail: Tie your hair into a high ponytail.
- Divide the ponytail: Divide the ponytail into two sections.
- Create a new section: Take a small section of hair from below the ponytail and pull it through the middle of the two sections.
- Repeat the process: Repeat this process, taking new sections of hair from below and pulling them through the middle.
- Continue until the end: Continue until you reach the end of your hair.
- Secure with an elastic: Secure the end with an elastic.
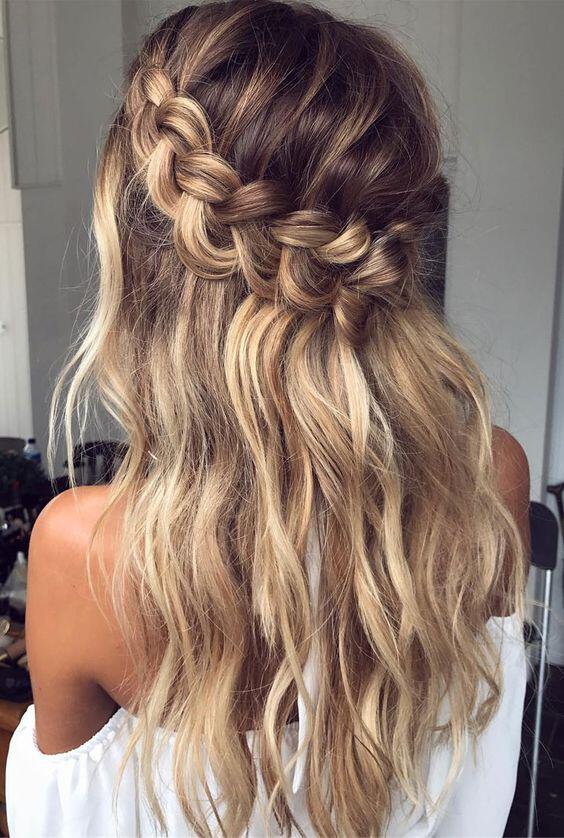
6. The Waterfall Braid
The waterfall braid is a romantic and flowing style that leaves some of your hair loose, creating a cascading effect.
- Start a French braid: Begin with a French braid, but instead of incorporating all the hair into the braid, let strands of hair fall down like a waterfall.
- Leave strands: As you braid, leave a strand of hair hanging down before adding a new strand from the top.
- Continue braiding: Continue braiding, adding new strands and leaving others to fall.
- Secure the braid: Secure the end of the braid with an elastic.
7. The Milkmaid Braid
The milkmaid braid is a charming and whimsical style, perfect for adding a touch of fairytale magic to your look.
- Part your hair: Part your hair down the middle.
- Braid each side: Braid each side of your hair into a loose braid.
- Wrap around your head: Wrap each braid around your head, securing them at the opposite side with bobby pins.
8. The Rope Braid
The rope braid is a simple yet elegant style that is perfect for adding a touch of sophistication to your look. It’s surprisingly easy once you get the hang of it.
- Gather your hair: Gather all of your hair into a ponytail.
- Divide the ponytail: Divide the ponytail into two equal sections.
- Twist each section: Twist each section of hair tightly.
- Twist together: Twist the two twisted sections together in the opposite direction.
- Secure with an elastic: Secure the end with an elastic.
9. The Double Braid
The double braid is a simple yet effective style that is perfect for adding a touch of elegance to your look. It’s ideal for managing thicker hair.
- Part your hair: Part your hair down the middle.
- Braid each side: Braid each side of your hair into a classic three-strand braid.
- Secure with elastics: Secure the end of each braid with an elastic.
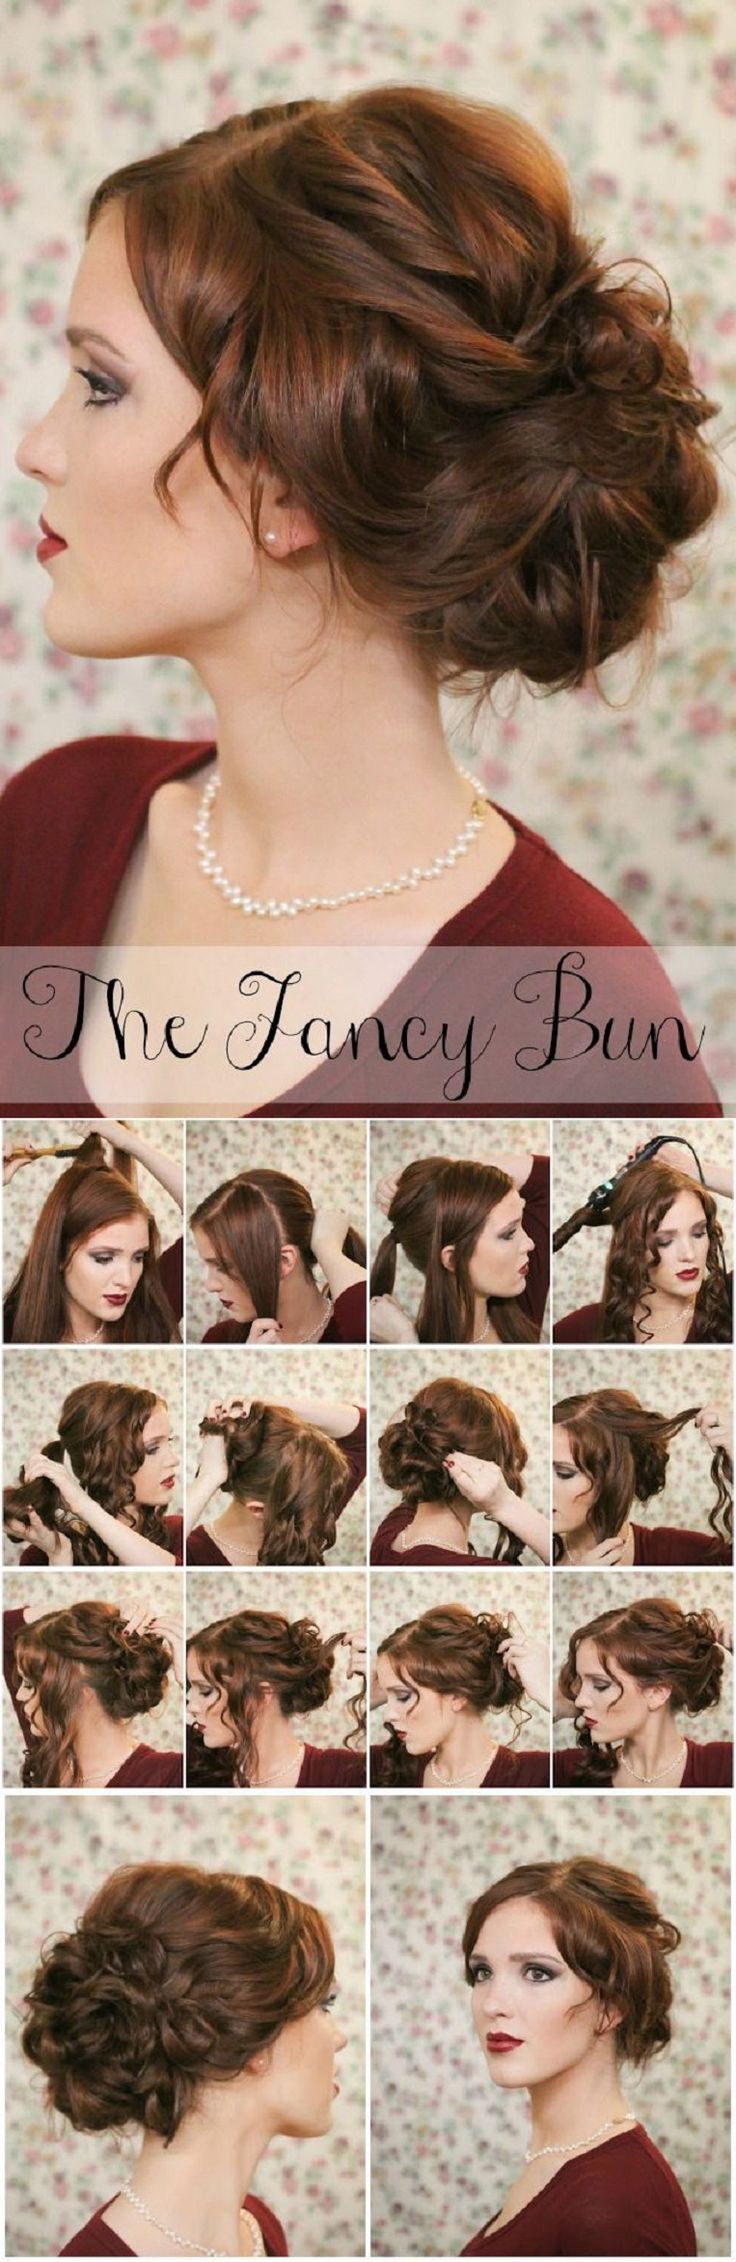
10. The Braided Bun

The braided bun combines the elegance of a bun with the intricacy of a braid, creating a stylish and sophisticated look. This is a versatile style suitable for both casual and formal occasions.
- Tie a high ponytail: Tie your hair into a high ponytail.
- Braid the ponytail: Braid the ponytail into a three-strand braid.
- Wrap the braid: Wrap the braid around the base of the ponytail to create a bun.
- Secure with bobby pins: Secure the bun with bobby pins.
For those seeking simple hairstyles for a first date, check out our guide: Simple Hairstyles for First Date: A Beginners Guide. And if you’re interested in shorter styles, you might find our article on Buzz Cut Hairstyles for Active Men: A Guide helpful.
Conclusion
Learning to braid your hair opens up a world of styling possibilities. These 10 easy braided hairstyles for beginners are a great starting point for developing your braiding skills. Remember, practice makes perfect! The more you experiment, the more confident and creative you’ll become. Don’t be afraid to try different variations and personalize these styles to suit your own unique taste. For more inspiration and tutorials, visit our website: 10 Easy Braided Hairstyles for Beginners. Happy braiding!
(Note: Remember to replace the bracketed “ ” placeholders with actual images.)


Comments